
Overview
In the instruction area you will find all handouts, user manuals and documentation related to the service.
Handouts Lecture Recording (PDF in german)
Lecture recording from home
Instructions for recording events, whether in the lecture halls or from home via Opencast Studio, OBS and PowerPoint, as well as other tips and
Recommendations for digital teaching at the University of Stuttgart can be found in our ILIAS learning module:
First aid for digital teaching.
Event recording in the lecture halls
In order that your recording can be edited and delivered, please place an order before the event. Please fill out the following application for event recording. We will provide you with the recording material in the form you require in ILIAS or as a download.
Please note: Recording is basically possible at any time, even if no order has been placed. In this case it is an unannounced recording. To receive your recording material you have to contact the support . Otherwise this data will not be processed.
In order to create your lectures in the correct ILIAS group and manage them there, you have to proceed as follows:
- Create an opencast object in your ILIAS group (not a mediacast object!)
- Open the object and scroll down to the bottom
- There you will find a "link to this page". Please copy it into the appropriate field
The link contains the text component "ilias_xmh". If you have chosen a link with text component "crs" or "mcst", you do not have the correct link!
If not already done, start the multimedia system of the room (projection and microphones). Connect notebooks, cameras, sound generators etc. to the system as usual and select the appropriate sources and projectors on the multimedia system as desired. In any case, remember to put on and test the microphone.
If you have any questions up to this step, the multimedia technology team of the respective campus will support you:
Select the "Transfer" tab on the Multimedia Console. The password is: 0815
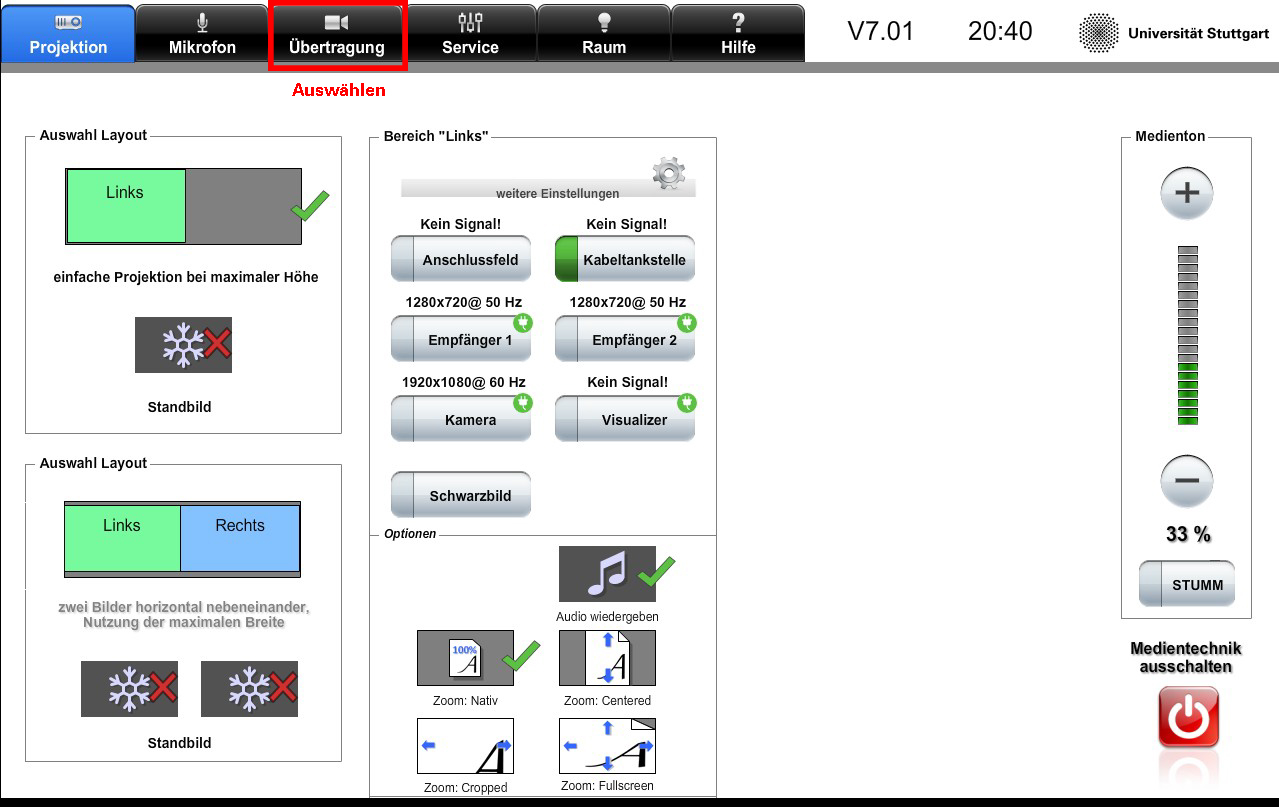
You are now in the assignment of the two transmission lines to your image sources.
We can record a maximum of two image sources. You can connect any combination of image sources to the transmission lines and also change them during the event.

Explanation of the sources:
- The cable station is located at the lectern and contains cables for VGA, HDMI, analogue audio (jack) and LAN, which automatically retract.
- The connection panel is usually attached to the table at hip height or recessed at the back of the table. There are separate connections for the above mentioned sources. If necessary, please bring a VGA or HDMI cable with you!
- Important: You can only connect one picture source to the connector panel and one picture source to the cable filling station - not, for example, both picture sources to the cable filling station.
- The Visualizer is a (permanently connected) device that replaces the previous overhead projectors and can be used to present and record slides and handwritten notes. You are welcome to use this source as an alternative to a blackboard, which tends to be harder to read in the lecture hall and on video! Open the Visualizer and adjust the desired section with the zoom buttons.
- If you select the camera as source, you must also decide whether you want to record a full shot or only the blackboard.
- If you only need one image source, simply leave the other transmission line at "Transmission off/black image". You can also select other sources in the middle of the current recording.
Useful combinations are, for example:
- Transmission line 1 - "Camera" and transmission line 2 - "Cable filling station" (if you want to record a beamer image and yourself or the blackboard)
- Transmit line 1 - "cable filling station" and transmit line 2 - "connector panel" (if you have connected a tablet and a notebook, for example).
After selecting the sources, you will see a preview image with a slight delay.
IMPORTANT: The control of the transmission lines is completely independent of the control of the signals for the projectors in the lecture hall. If you change the image in the lecture hall (e.g. switching the Visualizer to one of the projectors instead of a tablet or switching off your notebook), the recorded image will not change! You must do this manually in the "Transfer" menu. This may seem tedious, but it is important because otherwise you would not have a free hand in choosing the media in the lecture hall, for example when you take a camera shot.
Now make sure that the microphone is switched on, both on the transmitter (the LED must be lit) and under "Microphone" on the auditorium control unit.
- Now press the START button. It takes up to three seconds before recording starts. You will notice this by the label "RECORDING" in the lecture hall.
- You can interrupt the recording briefly (up to 30 minutes) with the PAUSE button and resume it by pressing START again.
- Press the STOP button to end the recording.
- Now simply hold your event as usual. Press STOP at the end of the event. If necessary, switch off the multimedia control.
The recordings are available in the ILIAS Opencast object or as a download link to you.
In ILIAS you can still edit the beginning and end of the event:
- Go to your Opencast object and click on "Manage recordings", "Edit recordings
- The recording is only rendered after the start/end cut. You can publish the finished recording for the students after about four hours. To do this, visit your opencast object again and click on "Manage recordings", "Finished recordings".
IMPORTANT: If you do not pass on the recording for rendering as described and publish it afterwards, the students will not be able to view it! Please do this early, not at the end of the semester, because the processing will take a long time!
You can release or withdraw an individual recording or all recordings together for the ILIAS group members to view at any time, e.g. for didactic reasons.
- Always repeat the questions asked briefly into the microphone. Otherwise you will only hear the answer, not the question, in the recording.
- For example, if you are recording a presentation and a camera image, it is recommended that you keep the presentation on the same broadcast channel at all times, as this has advantages in terms of the quality of the playback.
- If you have selected a camera as one of your sources Make sure to inform everyone present that the event is being recorded and, if necessary, clarify in which area of the camera image the people present can be seen.
Lecture halls with recording equipment
In the following lecture halls, you can conveniently start, pause and stop your recording yourself via the touch panel and select the recorded sources.
Please note: Only you yourself can start the recording! If you do not do this, the recording will not be made automatically in these halls!
| Name | Picture sources | Document imaging camera (Visualizer) | Status |
|---|---|---|---|
| Bandtäle V2.01 | Beamer picture | ready | |
| Bandtäle V2.21 | Beamer picture, Camera | ready | |
| Pfaffenwaldring V4.01 | Beamer picture | ready | |
| Pfaffenwaldring V6.01 | Beamer picture | ready | |
| Pfaffenwaldring V6.02 | Beamer picture, Camera | ready | |
| Pfaffenwaldring V7.01 | Beamer picture, Camera | Available | ready |
| Pfaffenwaldring V7.02 | Beamer picture, Camera | Available | ready |
| Pfaffenwaldring V7.03 | Beamer picture, Camera | Available | ready |
| Pfaffenwaldring V7.04 | Beamer picture, Camera | Available | ready |
| Pfaffenwaldring V7.11 | Beamer picture, Camera | ready | |
| Pfaffenwaldring V7.12 | Beamer picture | ready | |
| Pfaffenwaldring V7.22 | Beamer picture, Camera | ready | |
| Pfaffenwaldring V7.23 | Beamer picture | Available | Test phase |
| Pfaffenwaldring V7.31 | Beamer picture, Camera | ready | |
| Pfaffenwaldring V7.32 | Beamer picture | ready | |
| Pfaffenwaldring V7.41 | Beamer picture | ready | |
| Pfaffenwaldring V9.01 | Beamer picture, Camera | Available | ready |
| Pfaffenwaldring V9.02 | Beamer picture | ready | |
| Pfaffenwaldring V9.11 | Beamer picture | ready | |
| Pfaffenwaldring V9.12 | Beamer picture | ready | |
| Pfaffenwaldring V9.21 | Beamer picture | ready | |
| Pfaffenwaldring V9.22 | Beamer picture | ready | |
| Pfaffenwaldring V9.31 | Beamer picture | ready | |
| Pfaffenwaldring V9.32 | Beamer picture | ready | |
| Pfaffenwaldring V9.41 | Beamer picture | ready | |
| Pfaffenwaldring V23.01 | Beamer picture | ready | |
| Pfaffenwaldring V27.01 | Beamer picture | Available | Test phase |
| Pfaffenwaldring V27.02 | 2x Beamer picture, Camera | Available | ready |
| Pfaffenwaldring V27.03 | Beamer picture | Available | Test phase |
| Pfaffenwaldring V29.01 | Beamer picture | Available | Test phase |
| Pfaffenwaldring V31.01 | 2x Beamer picture, Camera | ready | |
| Pfaffenwaldring V31.51 | Beamer picture | ready | |
| Universitätsstraße V38.01 | 2x Beamer picture, Camera | Available | ready |
| Universitätsstraße V38.02 | 2x Beamer picture, Camera | Available | ready |
| Universitätsstraße V38.03 | 2x Beamer picture, Camera | Available | ready |
| Universitätsstraße V38.04 | 2x Beamer picture, Camera | Available | ready |
| Pfaffenwaldring V47.01 | 2x Beamer picture, Camera | Available | ready |
| Pfaffenwaldring V47.02 | 2x Beamer picture, Camera | Available | ready |
| Pfaffenwaldring V47.03 | 2x Beamer picture, Camera | Available | ready |
| Pfaffenwaldring V47.04 | Beamer picture | Available | ready |
| Pfaffenwaldring V47.05 | Beamer picture | ready | |
| Pfaffenwaldring V47.06 | Beamer picture | ready | |
| Audimax V53.01 | 2x Beamer picture, Camera | Available | ready |
| Pfaffenwaldring V57.01 | 2x Beamer picture, Camera | Available | ready |
| Pfaffenwaldring V57.02 | 2x Beamer picture, Camera | Available | No audio signal via HDMI/3.5 jack |
| Pfaffenwaldring V57.03 | 2x Beamer picture, Camera | Available | ready |
| Pfaffenwaldring V57.04 | 2x Beamer picture, Camera | No audio signal via HDMI/3.5 jack |
|
| Pfaffenwaldring V57.05 | 2x Beamer picture, Camera | ready | |
| Pfaffenwaldring V57.06 | 2x Beamer picture, Camera | ready |
In the following lecture halls, you can conveniently start, pause and stop your recording yourself via the touch panel and select the recorded sources.
Please note: Only you yourself can start the recording! If you do not do this, the recording will not be made automatically in these halls!
| Name | Picture sources | Document imaging camera (Visualizer) | Audio connection to Webex |
Status |
|---|---|---|---|---|
| Temporary lecture hall M2.00 | 2x Beamer picture, Camera | available | defective | ready |
| Temporary lecture hall M2.01 | 2x Beamer picture, Camera | available | ready | ready |
| Temporary lecture hall M2.02 | 2x Beamer picture, Camera | available | defective | ready |
| Breitscheidstr. M2.31 | Beamer picture | ready | ||
| Breitscheidstr. M2.41 | Beamer picture | ready | ||
| Tiefenhörsaal M17.01 | 2x Beamer picture, Camera | available | ready | |
| Tiefenhörsaal M17.02 | 2x Beamer picture, Camera | available | ready | |
| Keplerstr. M17.11 | Beamer picture | ready | ||
| Keplerstr. M17.12 | 2x Beamer picture, Camera | ready | ready | |
| Keplerstr. M17.13 | Beamer picture | ready | ||
| Keplerstr. M17.14 | Beamer picture | ready | ||
| Keplerstr. M17.15 | Beamer picture | ready | ||
| Keplerstr. M17.16 | Beamer picture | ready | ||
| Keplerstr. M17.17 | 2x Beamer picture, Camera | ready | ready | |
| Keplerstr. M17.21 | 2x Beamer picture, Camera | ready | ready | |
| Keplerstr. M17.22 | Beamer picture | defective |
||
| Keplerstr. M17.23 | 2x Beamer picture, Camera | ready | ready | |
| Keplerstr. M17.24 | Beamerbild | ready | ||
| Keplerstr. M17.25 | 2x Beamer picture, Camera | ready | ready | |
| Keplerstr. M17.51 | Beamerbild | ready | ||
| Keplerstr. M17.52 | 2x Beamer picture, Camera | ready | ready | |
| Keplerstr. M17.71 | Beamer picture | ready | ||
| Keplerstr. M17.72 | Beamer picture | defective |
||
| Keplerstr. M17.73 | Beamer picture | ready | ||
| Keplerstr. M17.74 | 2x Beamer picture, Camera | ready | ready | |
| Keplerstr. M17.81 | Beamer picture | ready | ||
| Keplerstr. M17.91 | Beamer picture | ready | ||
| Keplerstr. M17.92 | 2x Beamer picture, Camera | ready | ready | |
| Keplerstr. M17.98 | Beamer picture | ready | ||
| Keplerstr. M17.99 | Beamer picture | defective |
||
| Azenbergstr. M12.01 | 2x Beamer picture, Camera | available | ready | ready |
| Azenbergstr. M12.02 | Beamer picture | ready | ||
| Azenbergstr. M12.11 | Beamer picture | ready | ||
| Azenbergstr. M12.21 | Beamer picture | defective |
||
| Azenbergstr. M18.01 | Beamer picture | ready | ||
| Azenbergstr. M18.11 | 2x Beamer picture, Camera | available | ready | ready |
| Keplerstr. M11.11 | Beamer picture, Camera | ready | ready | |
| Keplerstr. M11.32 | Beamer picture, Camera | ready | ready | |
| Keplerstr. M11.42 | Beamer picture, Camera | ready | ready | |
| Keplerstr. M11.62 | Beamer picture, Camera | ready | ready | |
| Keplerstr. M11.71 | Beamer picture, Camera | ready | ready | |
| Keplerstr. M11.82 | Beamer picture, Camera | ready | Camera defective |
|
| Keplerstr. M11.91 | Beamer picture, Camera | ready | Camera defective |
|
| Herdweg M51.01 | Beamer picture | Test phase |
Please note: In the automated lecture halls you have no possibility to start the recording yourself. Your event must be pre-registered with us using the application form!
| Name | Picture sources | Audio source | Status |
|---|---|---|---|
| Pfaffenwaldring V55.01 | Beamer picture | Separate microphone | defective |
| Pfaffenwaldring V55.02 | Beamer picture | Lecture hall sound | defective |
| Pfaffenwaldring V55.03 | Beamer picture | Separate microphone | defective |
| Pfaffenwaldring V55.21 | Beamer picture | Separate microphone | planned |
| Pfaffenwaldring V55.22 | Beamer picture | Lecture hall sound | planned |
A live transmission can take place from large lecture halls to other large lecture halls and also to smaller lecture halls.
However, this is only possible for each building. So it is possible to transfer from V7.01 to V7.02 and V7.21, but not from V7.32 to V7.01 or from V47.01 to V7.01 (not the same building).
Please note that there is never a "back channel" between the lecture halls. If you are planning such a streaming, please contact Multimediatechnik Vaihingen / Multimediatechnik Stadtmitte first. If you have more detailed questions, please send us an email.