Overview
In the instruction area you will find all handouts, user manuals and documentation related to the service.
BERA instructions for students & employees (PDF; german, english)
E-mail configuration for employees and students
You can access your mailbox on the central mailserver with a variety of different mail programs.
Recommendations for different operating systems:
|
Operating System |
Client |
|
Windows 10/11 |
Outlook from the (chargeable) Office package Thunderbird |
|
Android |
Native Android Mail-App with connection via Active-Sync |
|
Apple iOS |
native iOS Mail-App with connection via Active-Sync |
|
Apple macOS |
native macOS Mail-App with connection via Active-Sync from the (chargeable) Office package Thunderbird |
|
Linux |
Thunderbird Evolution |
|
Outlook Web Access |
Web-Mail at https://mail.uni-stuttgart.de |
Microsoft has released a new version of the email client "New Outlook" which is problematic from an IT security and data protection perspective. This free app, available for Windows 10 and 11 - not to be confused with Outlook from the paid Office package - transfers account login information to Microsoft cloud servers. The app must not be used as this would violate the University of Stuttgart's IuK-Nutzungsordnung usage regulations and pose a risk to data confidentiality. A similar problem also applies to the Outlook app on Android and iOS/macOS.
Continue to use Outlook, which is included in the (paid) Microsoft Office package, or alternative email clients such as Thunderbird.
You can use the following interfaces for your e-mail client:
| Webmail | https://mail.uni-stuttgart.de/owa | 443 | SSL |
| IMAP | imap.uni-stuttgart.de | 993 | SSL |
| POP3 | pop3.uni-stuttgart.de | 995 | SSL |
| SMTP | smtp.uni-stuttgart.de | 465 | SSL/TLS |
| ActiveSync | activesync.uni-stuttgart.de | 443 | SSL |
| Exchange Web Services (EWS) | https://mail.uni-stuttgart.de/ews/exchange.asmx | 443 | SSL |
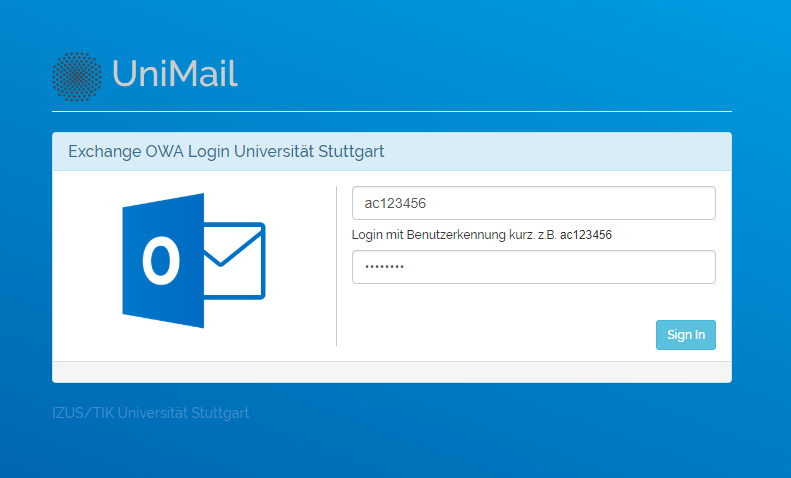
1. Log in to the UniMail web interface.
- Please visit the page https://mail.uni-stuttgart.de
- The login takes place with your short user ID in the following form:
ac****** (for employees)
st******(for students)
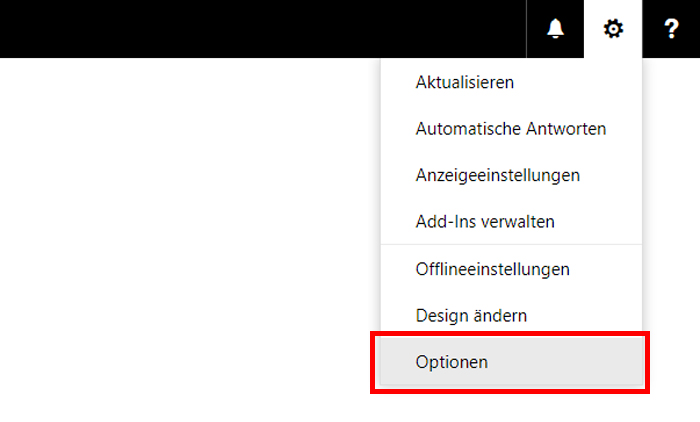
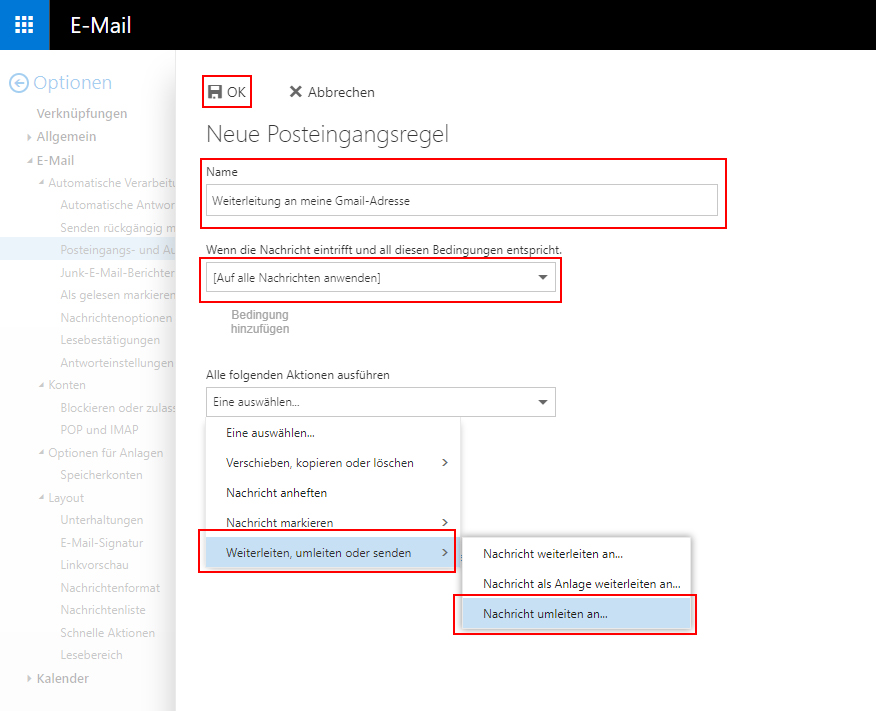
2. Select "Options" from the "Settings" menu (gear symbol):
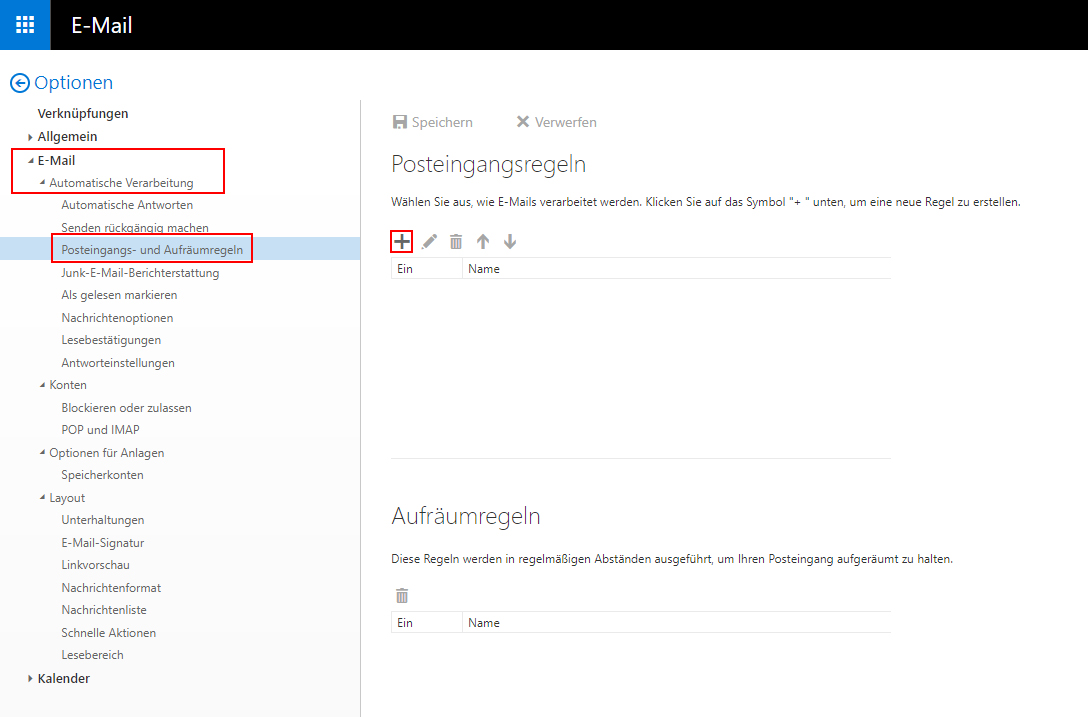
3. You are now in the options. On the left side there is a nested menu structure. There, select "Incoming mail and cleanup rules". This is located as a submenu item under the option "E-Mail" > "Automatic processing". To create a new forwarding, click on "Add" (plus symbol) in the "Incoming Mail Rules".
4. Create a new call forwarding.
- Choose a name for the rule (it can be any name you like)
- As condition select "Apply to all messages".
- As action select "Forward, Redirect or Send" > "Redirect Message To".
- A pop-up appears. In the line "Forward message to...", enter the e-mail address to which the message should be forwarded
- Confirm the changes with "Ok".
- It may take a few minutes for the rule to become active.
Calendar
To connect your calendar in Thunderbird to the Exchange server of the Universität Stuttgart you need the add-ons TbSync and Provider for Exchange ActiveSync. These add-ons allow you to use your calendar from Thunderbird version 68.x. You can find out which Thunderbird version is installed in the application menu of Thunderbird under "Help" > "About Mozilla Thunderbird". Please note that the integration of shared calendars via TbSync is currently not yet possible. Please use the web interface.
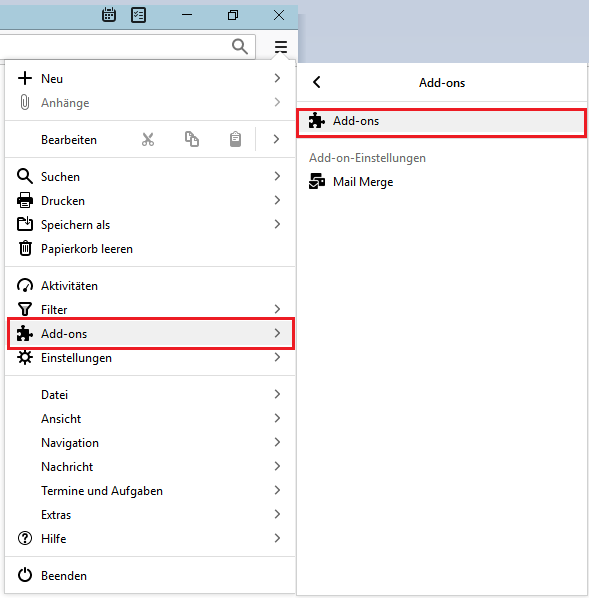
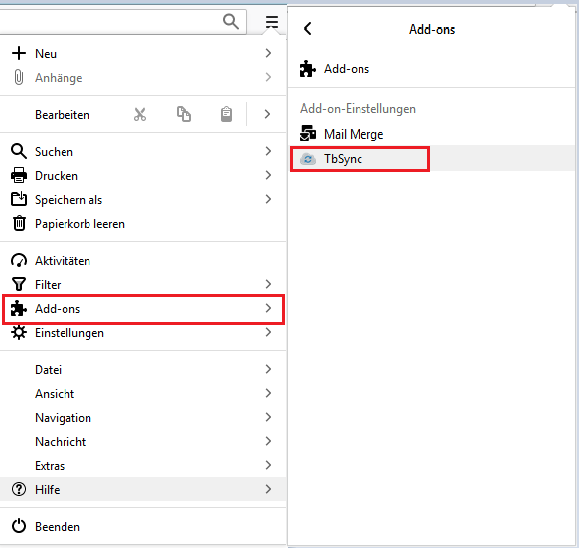
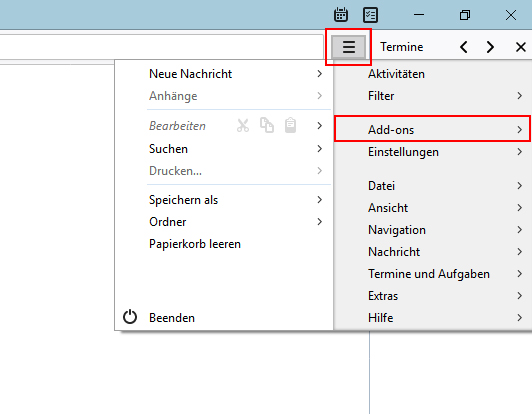
1. Open Thunderbird. From the Application menu, click Add-ons > Add-ons. A new tab with the Add-on management opens.
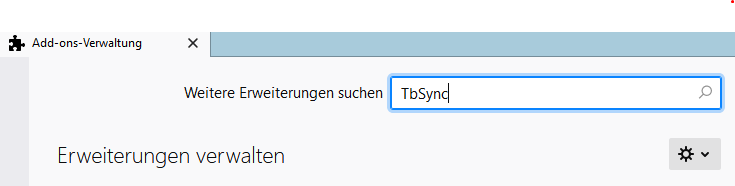
2. In Add-on Management, search for "TbSync"
3. Add the add-ons "TbSync" and "Provider for Exchange ActiveSync" to Thunderbird
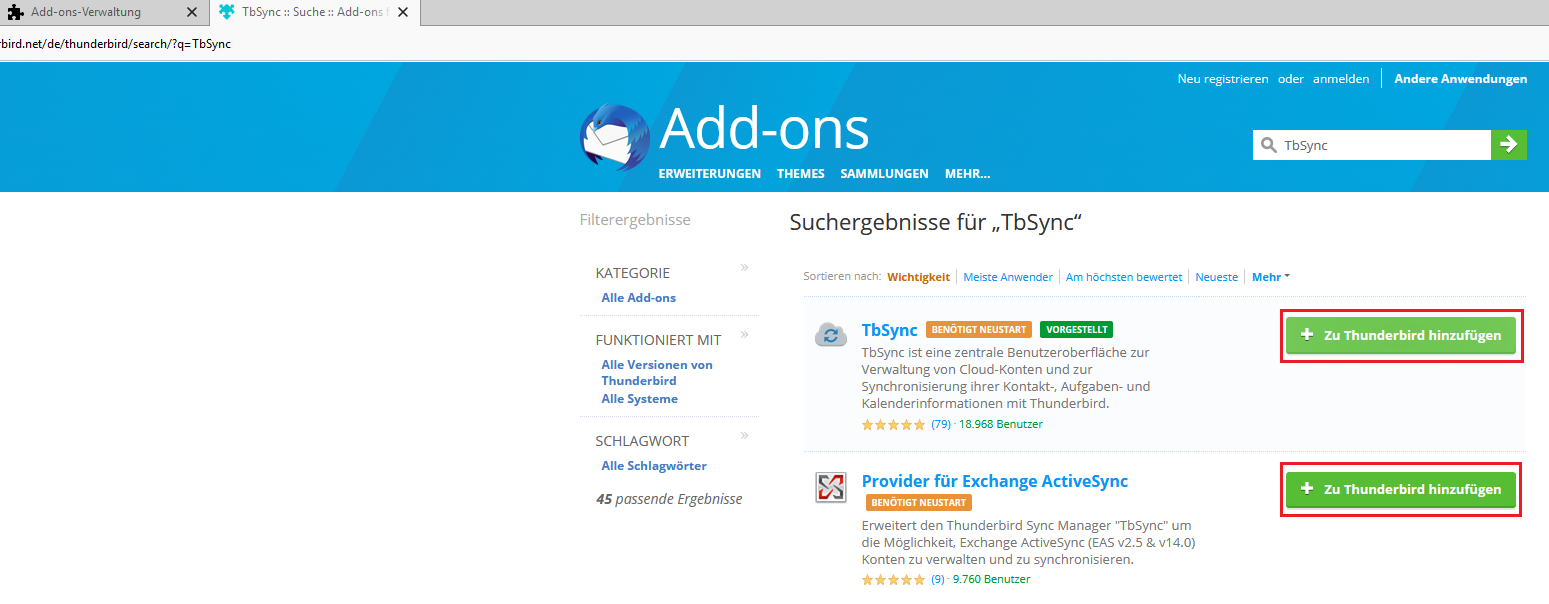
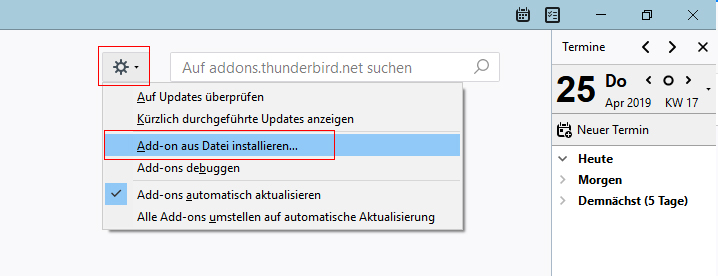
Alternatively, you can download the add-ons from the following links and install them in Add-on Administration. To do this, click the gear icon "Tools for all add-ons" > "Install add-on from file".
4. Click Add-ons > TbSync in the application menu. A new window with the TbSync account management opens.
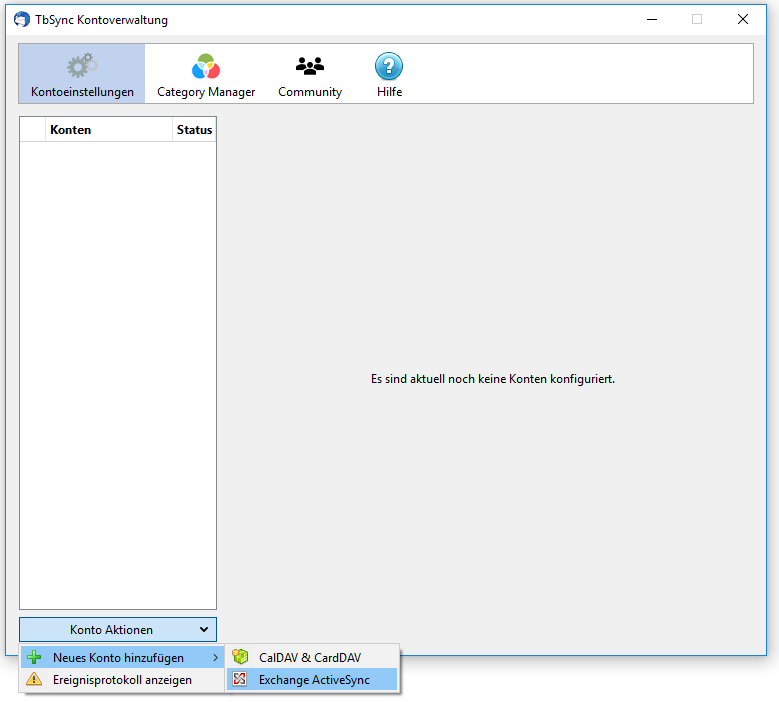
5. In TbSync account management, click on "Account Actions" > "Add New Account" > "Exchange ActiveSync
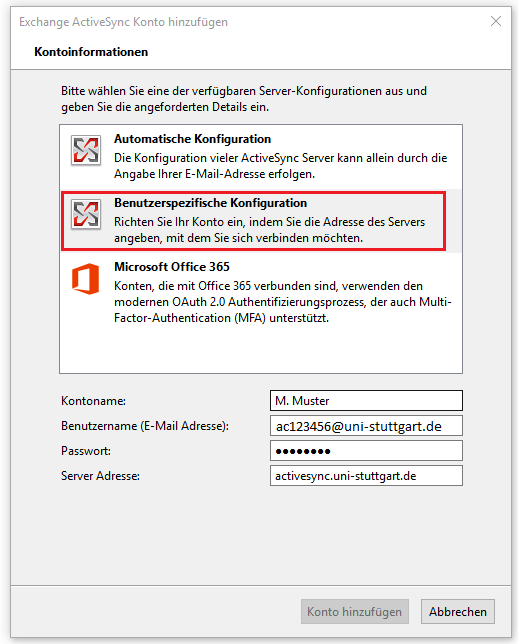
6. Select "User-specific configuration" to set it up. Now enter further data:
- "Account name": Your university e-mail address
"Username." Your user name in long form: - ac******@uni-stuttgart.de (for employees)
st******@stud.uni-stuttgart.de (for students) - "Password": The password associated with your user account
"Server address": Here you enter activesync.uni-stuttgart.de
Click on "Add account".
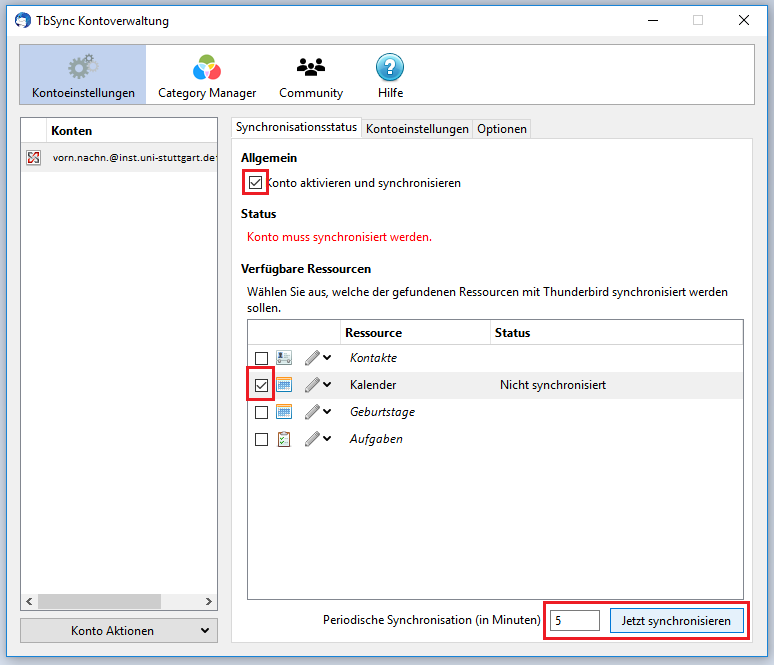
7. Select your account. Under "General" set a check mark at "Activate and synchronize account". Under "Available resources", place a check mark next to "Calendar". Under "Periodic Synchronization (in minutes)" enter a time interval at which the calendar should be synchronized (e.g. every 5 or every 10 minutes). Click on "Synchronize now".
Please note: If you do not specify a time interval, there will be no periodic synchronization. Push synchronization is currently not yet supported.
Information for Thunderbird 68.x: With the latest upgrade from Thunderbird to version 68.x, the EWS plugin is currently not yet supported. We therefore recommend the add-on TbSync for current Thunderbird versions.
To connect your calendar in Thunderbird to the Exchange Server of the Universität Stuttgart, you need the Exchange Web Services Plugin (EWS). The EWS plugin we have linked to the download is valid for Thunderbird version 60.0 and higher. You can find out which Thunderbird version is installed in the Thunderbird application menu under "Help" > "About Mozilla Thunderbird".
1. Under this link you can download the EWS plugin. If you use Mozilla Firefox as your browser, click on the link with the right mouse button and select "Save target as...".
2. Open Thunderbird. Click Add-ons on the Application menu.
3. A new tab opens, you are now in the Add-On management. In the "Extensions", "Themes" or "Plugins" areas, click on the gear wheel icon "Tools for all add-ons" > "Install add-on from file".
4. Select the previously downloaded EWS plugin. Usually a window will open with a warning about add-ons from other sources. Click on "Install now".
5. Start Thunderbird new.
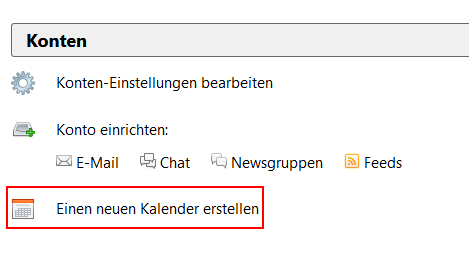
6. Click "Create a new calendar" under "Accounts" in the main navigation area.
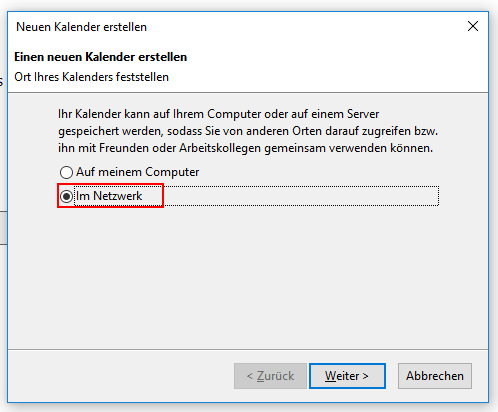
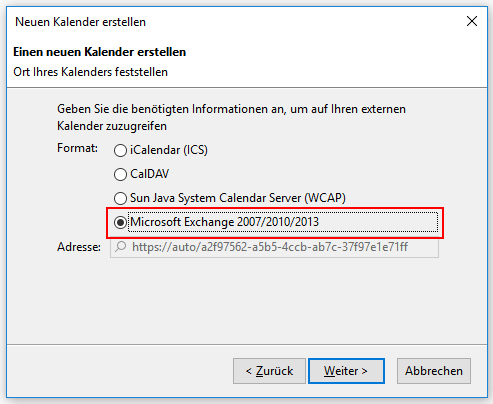
7. Now select "In network" and click on "Next".
8. Then select "Microsoft Exchange 2007/2010/2013" and click "Next" again.
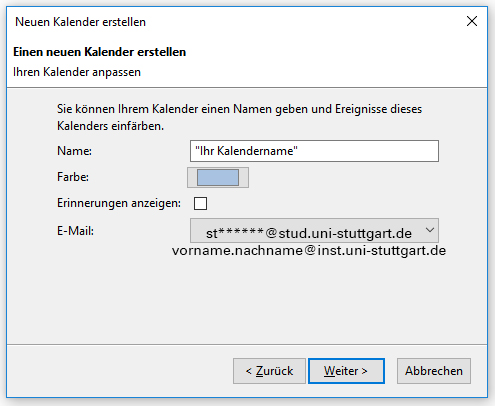
9. Give your calendar a name. Under "E-mail" in the drop-down menu, select your university e-mail address. Click on "Next".
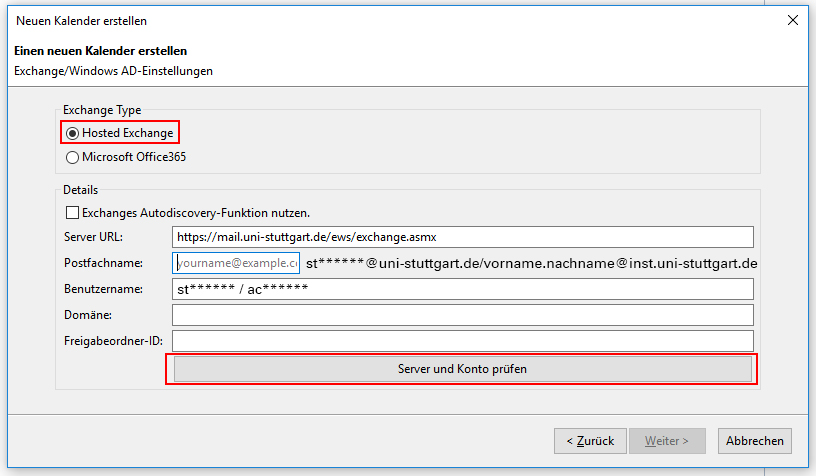
10. Now enter further data:
- "Exchange Type": Select "Hosted Exchange
- "Server URL": Specify the following: https://mail.uni-stuttgart.de/ews/exchange.asmx
- "P.O. Box name." Your university e-mail address (this should be the default)
- "Username." Your username in short form:
- ac****** (for employees)
- st****** (for students)
Enlarge the window or scroll further down. All other input fields remain empty. Click on "Check server and mailbox".
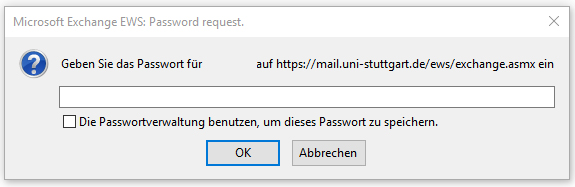
11. A pop-up appears with a password request. Enter the password associated with your user account and confirm with "OK".
 How to include shared calendars in Thunderbird is explained in the next paragraph.
Information for Thunderbird 68.x: With the latest upgrade from Thunderbird to version 68.x, the EWS plugin is currently not yet supported. To view and edit shared calendars, please use the web interface.
To include a foreign calendar in Thunderbird, make sure that it has been approved for you by the owner.
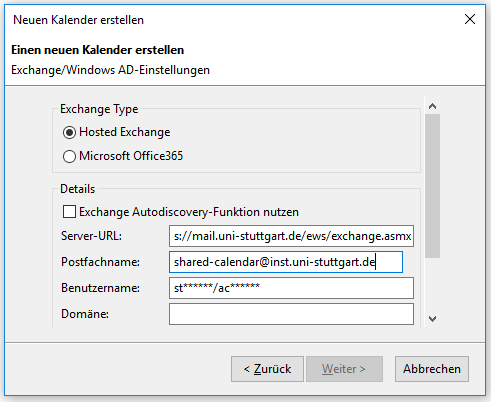
Follow the instructions in "Integrating Exchange Calendars in Thunderbird". If the EWS plugin is already installed, follow the instructions from step 6 to step 9. Enter the following data
- "Exchange Type": Select "Hosted Exchange
- "Server URL": Specify the following: https://mail.uni-stuttgart.de/ews/exchange.asmx
- "Mailbox name": The e-mail address of the shared calendar
- "Username." Your username in short form:
- ac****** (for employees)
- st****** (for students)
Enlarge the window or scroll further down. All other input fields remain empty. Click on "Check server and mailbox".
A pop-up appears with a password request. Enter the password associated with your user account and confirm with "OK".
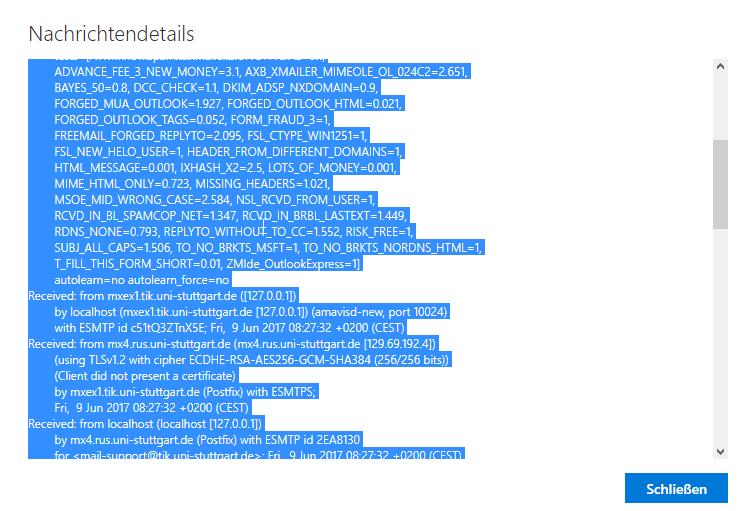
Mailheader
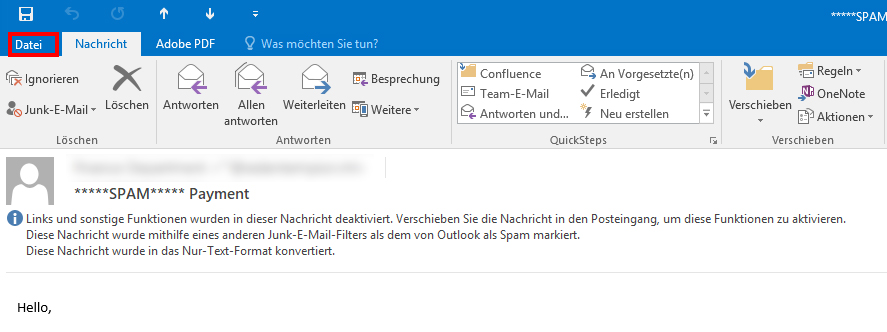
Depending on the case, you may be asked by our e-mail support to send the mail header of a message. Below is shown where you can find the mail header of an email in Outlook, Thunderbird and OWA On request, please send this mail header to the e-mail support.
1. Open the e-mail in a separate window and then click on "File".
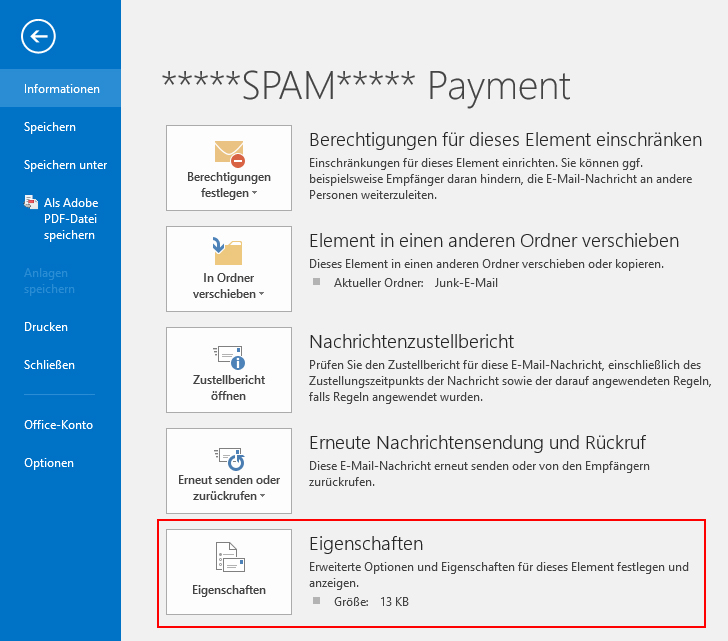
2. Click on "Properties".
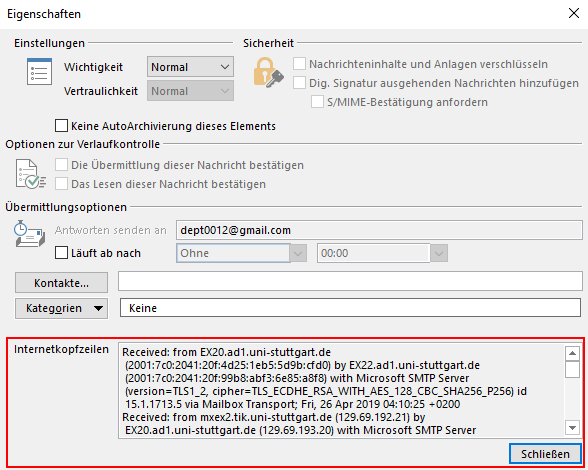
3. In the "Internet headers" field, mark the entire text and copy it. Send the text to e-mail support.
1. Open the email in a separate tab, then click the "More" drop-down menu at the top right. Then click on "Show source code".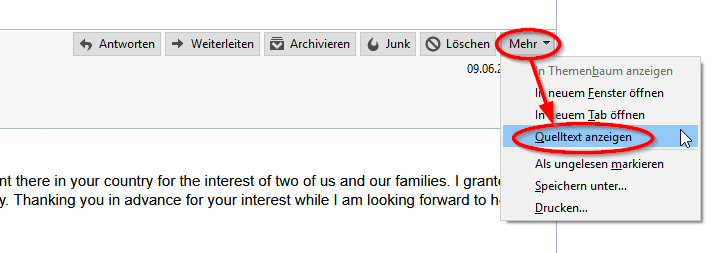
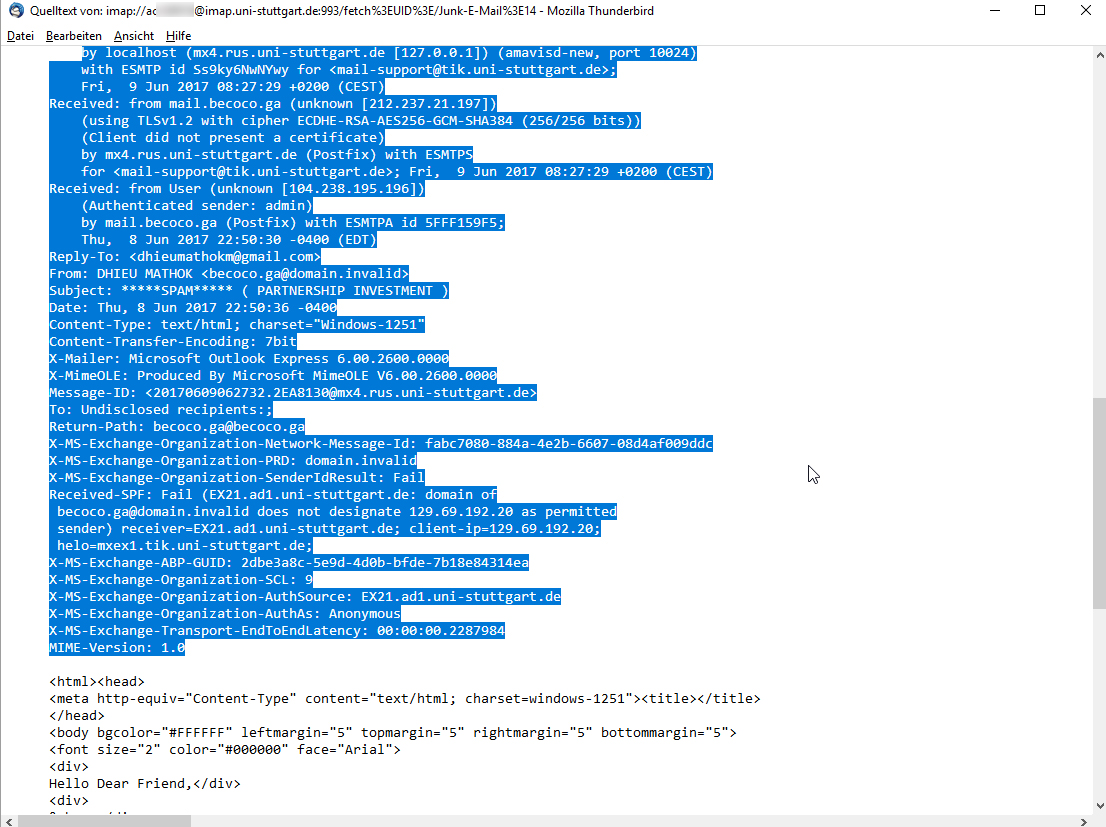
2. Select and copy the entire text above the beginning of the actual e-mail. Send the text to the e-mail support.
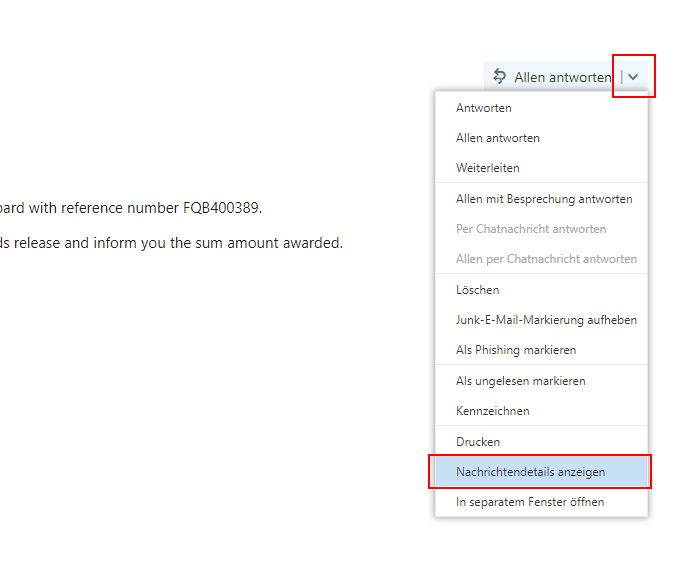
1. Click the small arrow at the top right of the answer options. In the drop-down menu that opens, select the "Show message details" option.
2. Select and copy the entire text. Send the text to the e-mail support.